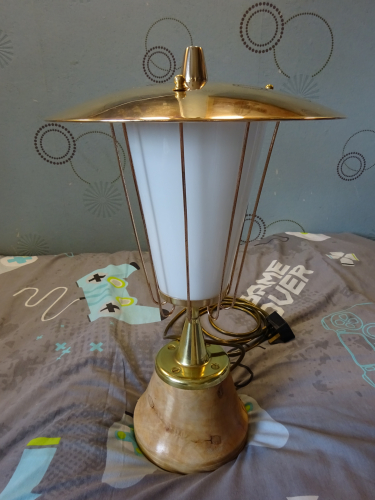
Falks GLS Pedestal light, after restoration.
Earlier this year I bought in this gorgeous Falks Pedestal light, which had been crudely 'upcycled' into a table lamp. Seeing past the mess to the potential it hid beneath the paint and dirt, I bought it and begun looking around for the parts that had been replaced or was missing.
 
First up was replacing the three hex nuts that should have been ball nuts. I managed to find some on eBay in an M4 thread, however they needed to be 4BA thread. I drilled the original thread out, retapped to M5, threadlocked the brass bolt in place, cut it flush and then drilled and tapped to 4BA. Part one done, the next and more complicated part was to find an original finial.

For this I needed to find a photo of one, and thanks to a fellow collector, was show an image of how it should look. This left me needing a piece of brass to turn and reshape, and that ended up showing itself in the most unusual of circumstances. Whilst digging around a column to move it while at work, a team mate hit some metal. It turned out to be an old brass lever, but with the almost perfect dimensions to become a new finial. I got it home, cut most of the bar off to allow me to put it in a drill. I cable tied the drill so it'd constantly spin, and with Dads help and his trusty flap disc in the angle grinder, turned the lever till it matched what I needed. I then cut the bar off completely before drilling and tapping into the now finial to 5/8" BSW. I got a brass bolt, washer and a rubber seal, and screwed the finial into place, really finishing off its 50's style beautifully. So that's the light completed again, the real restoration can now begin.

Polishing the light was actually fairly simple, the black paint on the base chipped off, and the 9 uprights were given to a neighbour to polish since he has a polishing wheel. Once the lid was polished, I painted the inside white, really smartening the whole thing up.
After much debating, I decided to keep it as a table lamp, its too nice to put outside again imo. So the wooden base was given to a mates stepfather, and he turned it with his lathe into a more fluted design, allowing the base of the pedestal to sit over the wood and not in it. It was finished with a light coloured wax to compliment the brass of the now fully polished light. Screwed back to the wood with 4 brass screws, the light was reassembled and rewired with gold flex, a much better fit than the black flex it was wired with.

Honestly I think this has turned out better than I thought it would, and the opal glass really softens the light from whatever lamps inside it (currently a CFL) so this may end up becoming my bedside table lamp.

Falks GLS Pedestal light, after restoration.

Earlier this year I bought in this gorgeous Falks Pedestal light, which had been crudely 'upcycled' into a table lamp. Seeing past the mess to the potential it hid beneath the paint and dirt, I bought it and begun looking around for the parts that had been replaced or was missing.

First up was replacing the three hex nuts that should have been ball nuts. I managed to find some on eBay in an M4 thread, however they needed to be 4BA thread. I drilled the original thread out, retapped to M5, threadlocked the brass bolt in place, cut it flush and then drilled and tapped to 4BA. Part one done, the next and more complicated part was to find an original finial.

For this I needed to find a photo of one, and thanks to a fellow collector, was show an image of how it should look. This left me needing a piece of brass to turn and reshape, and that ended up showing itself in the most unusual of circumstances. Whilst digging around a column to move it while at work, a team mate hit some metal. It turned out to be an old brass lever, but with the almost perfect dimensions to become a new finial. I got it home, cut most of the bar off to allow me to put it in a drill. I cable tied the drill so it'd constantly spin, and with Dads help and his trusty flap disc in the angle grinder, turned the lever till it matched what I needed. I then cut the bar off completely before drilling and tapping into the now finial to 5/8" BSW. I got a brass bolt, washer and a rubber seal, and screwed the finial into place, really finishing off its 50's style beautifully. So that's the light completed again, the real restoration can now begin.

Polishing the light was actually fairly simple, the black paint on the base chipped off, and the 9 uprights were given to a neighbour to polish since he has a polishing wheel. Once the lid was polished, I painted the inside white, really smartening the whole thing up.
After much debating, I decided to keep it as a table lamp, its too nice to put outside again imo. So the wooden base was given to a mates stepfather, and he turned it with his lathe into a more fluted design, allowing the base of the pedestal to sit over the wood and not in it. It was finished with a light coloured wax to compliment the brass of the now fully polished light. Screwed back to the wood with 4 brass screws, the light was reassembled and rewired with gold flex, a much better fit than the black flex it was wired with.

Honestly I think this has turned out better than I thought it would, and the opal glass really softens the light from whatever lamps inside it (currently a CFL) so this may end up becoming my bedside table lamp.

387A9186b.jpg 1000102278.jpg 1000102280.jpg Screenshot_20260826_161607_Gallery.jpg 387A9116.JPG
File information
Filename:DSC03271.JPG
Album name:Dave / Bulkheads
Filesize:2239 KiB
Date added:28 Aug, 2026
Dimensions:1536 x 2048 pixels
Displayed:23 times
URL:http://80.229.24.59:9232/gallery/displayimage.php?pid=25480
Favourites:Add to Favourites

Comment 1 to 4 of 4
Page: 1

LeoLampposts   [28 Aug, 2026 at 10:51 PM]
finding that brass lever in that way - wow! it was meant to be!
Beta 5   [29 Aug, 2026 at 09:45 AM]
That looks awesome, much better than the upcycling job it had previously!
AgentHalogen_87   [29 Aug, 2026 at 01:52 PM]
Looks awesome, you did well there!
Andy   [02 Sep, 2026 at 07:06 PM]
As per usual, an excellent restoration job! Cool

Comment 1 to 4 of 4
Page: 1

Add your comment
Anonymous comments are not allowed here. Log in to post your comment